Over 25 years on our production floor, we have seen dealers lose sales not because of a bad product, but because of a bad showroom setup.
The nine most common mistakes dealers make when displaying aluminum pergolas include showing bare frames without lifestyle context, poor showroom placement, failing to demonstrate motorized features, overcrowding the display, ignoring lighting and evening appeal, using mismatched finishes, skipping installation details, hiding customization options, and weak value storytelling.
Each of these errors quietly chips away at your close rate European standards 1. They make a premium product feel ordinary. Below, we break down the core problems and show you exactly how to fix them so your showroom does the selling for you.
How can I improve my showroom layout to better highlight the unique selling points of my aluminum pergolas?
When our team visits dealer showrooms across Europe, we often notice the same layout problems repeated in city after city. The pergola gets lost among other products.
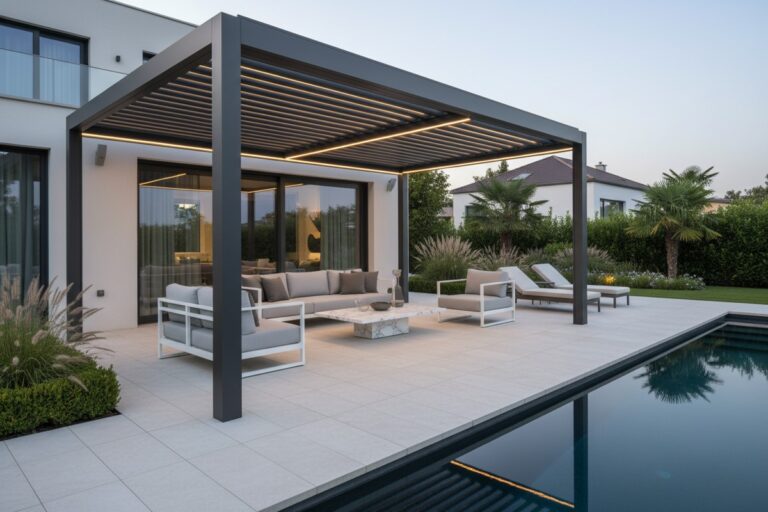
To improve your showroom layout, make the aluminum pergola a walk-under centerpiece with a clear sightline from the entrance, surround it with a realistic lifestyle vignette, and separate it from competing products so visitors immediately feel its scale, elegance, and purpose.

A showroom layout 2 is not just about floor space. It is a sales funnel made of physical objects. Every step a visitor takes should bring them closer to imagining the pergola in their own space, whether that is a backyard patio, a hotel terrace, or a restaurant courtyard. Here is how to think about it.
Mistake 1 — Displaying a Pergola Without a Use-Case Story
A bare aluminum frame on a concrete floor tells a visitor nothing. It looks like a construction sample, not a finished outdoor living space 3. Our engineering team designs every pergola system to solve real problems: shade control, rain management, wind protection 4, and evening atmosphere. But none of those benefits are visible when the product sits alone.
Build a scene. Place a dining table underneath. Add lounge chairs with weather-resistant cushions. Include a side table, a potted plant, and a small heater. The goal is to make the visitor stop walking and think, "I want to sit there."
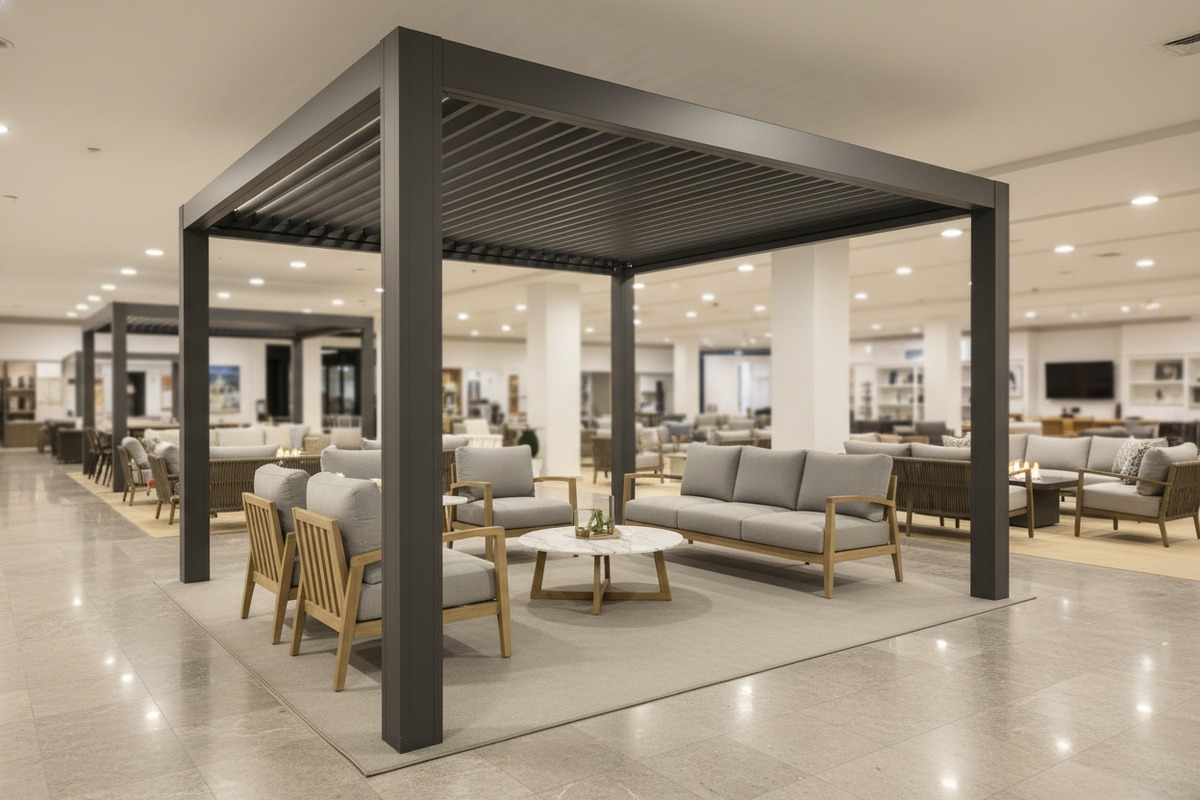
Mistake 2 — Poor Placement Inside the Showroom
If your pergola is crammed into a back corner or blocked by shelving, visitors will not approach it naturally. The pergola needs to be visible from the front door. It should have at least one meter of open space on every side so people can walk under it and look up at the louvered roof.
| Placement Factor | Bad Practice | Best Practice |
|---|---|---|
| Sightline from entrance | Blocked by shelves or walls | Clear, direct view within 3 seconds |
| Walkable space around pergola | Less than 0.5 m on each side | At least 1 m clearance all around |
| Ceiling height above pergola | Too low, feels cramped | Minimum 1 m between pergola top and ceiling |
| Proximity to competing products | Mixed with fencing, decking, etc. | Separated zone or dedicated platform |
Mistake 3 — Overcomplicating the Display
We ship pergolas alongside zip blinds, LED lighting kits, and automation packages. That does not mean you should pile every option on a single display. When there are too many swatches, brochures, furniture pieces, and accessories, the pergola stops being the hero. It becomes just another item in a cluttered room.
Keep the display focused. Show one or two key accessories. Use a side panel or digital screen for color options and upgrade paths. Let the pergola breathe.
The Residential vs. Commercial Layout Question
There is a real tension here. Residential buyers respond to cozy backyard scenes. Commercial buyers want to see durability, drainage, and large-span capability. If you serve both, create two distinct vignettes. Do not mix messages. A restaurant owner does not want to see throw pillows. A homeowner does not want to see industrial specs.
Why is my current floor model failing to convince my customers of the product's durability and wind resistance?
From the test data we collect at our factory, we know our aluminum pergolas 5 handle wind loads well above European standards. Yet dealers tell us customers still hesitate at the word "aluminum."
Your floor model fails to prove durability because it relies on verbal claims instead of visible, tangible evidence. You need to show material thickness, demonstrate structural rigidity, display wind-load certifications, and let customers physically touch and test the frame so they trust the engineering behind the finish.

Durability is not something customers can see by looking at a pretty pergola. They need proof. And that proof must be built into the display itself.
Mistake 4 — Neglecting Realism in Materials and Finishes
If your display uses cheap furniture, faded fabric, or mismatched accessories, customers unconsciously transfer that low quality to the pergola. The charcoal powder-coated aluminum frame 6 we produce has a clean, architectural finish. It demands equally clean surroundings. Use neutral tones. Choose stone, teak, or concrete accessories. Keep the lines modern and simple.
But more importantly, show the material itself. Cut a cross-section of the aluminum profile and place it on a small stand next to the pergola. Let visitors pick it up. Let them feel the wall thickness. This one small step does more for trust than any brochure.
Mistake 5 — Focusing on Aesthetics Without Communicating Weather Resistance
Many dealers hang a beautiful pergola and never mention that it handles 120 km/h winds, drains rainwater through integrated channels, or carries a certified snow load. These are exactly the facts that move a hesitant buyer to a signed contract.
| Durability Feature | How to Show It in the Showroom |
|---|---|
| Wind resistance rating | Display a visible certification plaque or poster near the pergola |
| Aluminum wall thickness | Provide a cut-away sample visitors can hold and compare |
| Powder coating quality | Show a scratch-test sample or weathering comparison panel |
| Drainage system | Use a small water demo or a clear video loop showing rain channeling |
| Snow load capacity | Include a simple infographic showing rated load vs. real-world conditions |
Mistake 6 — Not Addressing Installation, Footprint, and Code Realities
Customers are not just asking, "Is it beautiful?" They are asking, "Can I actually install this at my property?" Many dealers overlook this entirely. They show the pergola but say nothing about anchoring, setback rules, height restrictions, or permit requirements.
A simple solution is a printed or digital info panel next to the display. It should cover:
- Standard dimensions and available custom sizes
- Anchoring options: ground mount, wall mount, roof mount
- Typical permit requirements for residential and commercial use
- Recommended minimum footprint for different configurations
- Structural support needs for decks, patios, and rooftops
When you answer the "Can I actually have this?" question early, you remove the biggest objection before it forms.
A Word on Aluminum vs. Wood Perception
Some customers still assume wood is stronger. It is not. Aluminum does not rot, warp, crack, or attract insects. It maintains structural integrity 7 for decades with almost zero maintenance. But you have to say this. Better yet, show a side-by-side comparison. Place a weathered wood sample next to your aluminum profile. The contrast sells itself.
What mistakes am I making when demonstrating the motorized zip blinds and louver functions to my clients?
Our R&D team spends months perfecting the smooth rotation of louver blades and the silent retraction of zip blinds. But none of that matters if the dealer never turns on the motor during a showroom visit.
The most damaging mistake is keeping your motorized pergola static during demonstrations. You should always activate the louvers, zip blinds, lighting, and smart controls live in front of the customer, because the motion itself is the product's core value proposition and strongest emotional trigger.

A motorized pergola that sits still is just an expensive roof. The magic is in the movement. Here is what goes wrong and how to fix it.
Mistake 7 — Failing to Demonstrate the Moving Parts
This is the single most common showroom failure we hear about from our dealer partners. The pergola is installed, wired, and ready to run. But the salesperson talks about the louvers instead of pressing the button.
Every customer visit should include a live demonstration sequence:
- Open the louvers fully to show maximum sunlight
- Close them to show full shade and rain protection
- Tilt them to an intermediate angle to show ventilation control
- Deploy the zip blinds to show wind and privacy screening
- Turn on the integrated LED lighting
- If equipped, show the app or remote control interface
This sequence takes less than two minutes. It is the most powerful two minutes in your sales process.
Why Static Displays Kill Premium Sales
When customers cannot see the motorized features 8 in action, they default to comparing your pergola on price alone. Movement, silence, smoothness, and speed are all premium differentiators. They justify the mid-to-high-end pricing. Without a live demo, you are asking customers to pay extra for something they have to imagine.
Train Your Staff on the Technology
It is not enough to wire the pergola. Your salespeople must be able to operate every feature confidently. They should know how the rain sensor works, how the wind sensor triggers auto-close, and how the app connects. If a salesperson fumbles with the remote or cannot answer a technical question, the customer loses trust immediately.
| Demo Feature | Customer Benefit to Emphasize | Common Staff Mistake |
|---|---|---|
| Louver rotation | Adjustable shade and ventilation | Only showing fully open or fully closed |
| Zip blind deployment | Wind block, privacy, insect protection | Not deploying it at all during the visit |
| Integrated LED lighting | Evening ambiance, extended outdoor hours | Leaving it off because "it is daytime" |
| Rain sensor | Automatic protection, no manual intervention | Not explaining the sensor or simulating rain mode |
| App/remote control | Convenience, smart home integration 9 | Not having the app installed or paired |
Consider Interactive Elements
Some forward-thinking dealers now include tablets or touchscreens next to the pergola display. Customers can control the louvers themselves. This hands-on interaction builds ownership psychology. The customer is no longer watching a demonstration. They are already using the product. That mental shift is powerful.
For dealers with budget, augmented reality tools can also help. A customer points a tablet at the pergola and sees it superimposed on a photo of their own patio. This is still emerging, but early adopters report higher engagement and faster decision-making.
How do I ensure my showroom display effectively justifies the mid-to-high end pricing of my pergola systems?
When we set our factory pricing, every euro reflects real material, real engineering, and real testing. But if your showroom does not communicate that value, customers will only see a number on a quote.
To justify mid-to-high-end pricing, your showroom must combine atmospheric staging with clear value storytelling: show the pergola in a premium lifestyle context, demonstrate every functional feature live, display customization and modularity options, and connect the product to measurable outcomes like extended outdoor hours, weather resilience, and property value increase.

Price objections are rarely about the actual price. They are about perceived value. If your display looks cheap, the price feels high. If your display looks premium and functional, the price feels fair. Here are the final two common mistakes and the strategies to overcome them.
Mistake 8 — Failing to Show Customization and Modularity
Many of our dealers display only one fixed pergola configuration. This makes the product seem limited. In reality, our systems are highly modular. Customers can choose from multiple sizes, colors (any RAL code), side panels, zip blinds, heaters, fans, lighting packages, and automation levels.
Show this range. You do not need to build every option. But you should have:
- A color swatch board with actual powder-coated samples
- A modular layout diagram showing how the system expands
- One or two add-on accessories physically attached, like a heater or fan
- Before-and-after images of real installations at different scales
When a customer sees that the pergola adapts to their exact needs, they stop comparing it to a fixed-price commodity. They start thinking about their specific project. That is exactly where you want them.
Mistake 9 — Weak Storytelling Around Value and ROI
The last major mistake is presenting the pergola as a luxury object without explaining why it makes financial sense. For a homeowner, the value is year-round outdoor use, reduced indoor cooling costs, and increased property appeal. property value increase 10 For a restaurant owner, the value is more covers, more seasons, and fewer weather cancellations.
Do not rely on vague language like "premium outdoor living." Be specific. Use signage, case studies, or simple infographics that make the return tangible.
Connecting Features to Outcomes
Here is a framework your sales team can use during every customer conversation:
- Louver adjustment → "You control sunlight hour by hour, so your terrace is comfortable from morning to evening."
- Rain drainage → "Your guests stay dry. No scrambling to move inside."
- Zip blinds → "Wind, insects, and privacy are handled without closing up the space."
- LED lighting → "Your outdoor area works after sunset, not just during the day."
- Low maintenance aluminum → "No painting, no staining, no rot. Your total cost of ownership drops every year."
Lighting and Evening Appeal
This deserves special attention. A pergola display that only looks good under fluorescent showroom lights misses half the opportunity. Many buyers are imagining dinner parties, evening drinks, and nighttime ambiance. Install warm LED strips on the pergola. Use dimmable controls. If possible, create a brief "evening mode" during the demo where you dim the overhead showroom lights and let the pergola's own lighting take over. The emotional impact is immediate.
Small Showroom, Big Impact
Not every dealer has 200 square meters. If your showroom is small, focus on one fully staged pergola with all features active. Supplement with a large screen showing video of different installations: residential, commercial, poolside, rooftop. Use a compact accessory wall for swatches and samples. The key is depth over breadth. One perfect display beats three mediocre ones.
The Showroom Checklist
Before your next customer visit, walk through this list:
- Is the pergola visible from the entrance?
- Can visitors walk under it comfortably?
- Are the louvers, zip blinds, and lighting operational right now?
- Is the furniture clean, modern, and coordinated?
- Is there a material sample customers can touch?
- Are wind rating, drainage, and installation details visible?
- Can staff demonstrate every feature without hesitation?
- Is there a clear path to discuss customization?
- Does the display tell a value story, not just a beauty story?
If any answer is no, you have found your next improvement.
Conclusion
Your showroom is not just a room with a product in it. It is your most powerful sales tool. Fix these nine mistakes, and the pergola will start selling itself.
Footnotes
1. Explains Eurocode 1, Part 1-4, which details wind actions for structural design. ↩︎
2. Found a working article on the same domain about retail showroom success. ↩︎
3. Explains the benefits and importance of creating outdoor living spaces. ↩︎
4. Found a relevant article specifically discussing wind-resistant pergolas and aluminum. ↩︎
5. Provides a general overview of pergolas, including aluminum as a material. ↩︎
6. Highlights superior durability, UV resistance, and aesthetic appeal of powder-coated aluminum. ↩︎
7. Explains the definition and importance of structural integrity in construction. ↩︎
8. Explains smart pergola technology, including motorized louvers, sensors, and app control. ↩︎
9. Showcases various outdoor smart home devices and their integration capabilities. ↩︎
10. Details various outdoor upgrades and their impact on home value and ROI. ↩︎